Showing posts with label image. Show all posts

Monday, May 12, 2008

Photoshop Tutorial: How to Turn a Road into Water

Source: http://www.showandtell-graphics.com/road-to-water.html

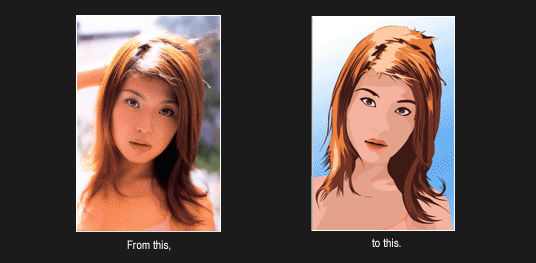
Turning a road into a stream with Photoshop is not terribly difficult. This project will turn out best if there is something interesting above the road to reflect off of the water that we will create.

Here is the photo that I will begin with.

You should have one layer labeled "Background". Double click on the layer in the layers palette and click ok to change it to a standard layer. Now duplicate the layer by selecting Layer/Duplicate Layer. Highlight the bottom layer and select Edit/Transform/Flip Vertical. This layer should now be upside down with respect to the top layer. This will be the image we use for our water reflection.

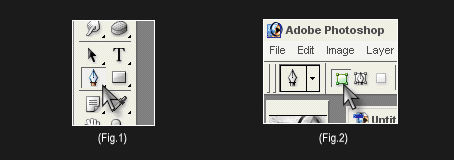
Now highlight the top layer. We need to select the road. I am going to use the Pen Tool. I like the Pen Tool because you can really get a lot of nooks and crannies with it.

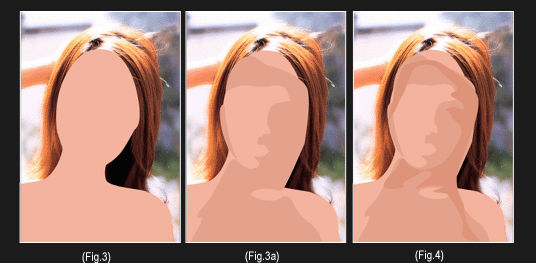
Carefully select every part where you want water to be. If your selection is not exactly perfect, it will probably be OK. The edge of a river or stream is never perfectly straight anyway. Once you have clicked all around what you want to select you will have to change the path that the Pen Tool makes into a selection. To do this simply right click on the document and choose "Make Selection" I have set the feather radius to one. This will help blend the water in better. For higher resolution pictures you will need to set the feather radius a bit higher to achieve the same effect. Here is my selection.

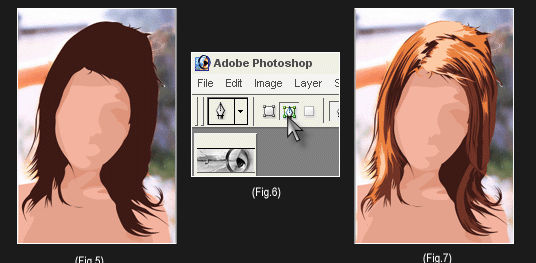
Next hit the delete key to show the reflection layer beneath. Hit Ctrl+D to deselect. You may have to move the reflection layer around a bit to get it to line up properly. I do have to move mine. Here is what it looks like before I moved it around.

As you can see the reflection does not line up quite right. Highlight the bottom layer, grab the Move Tool and move it around. Here is what mine looks like after I moved it. Much better!

The last thing we need to do is to make some ripples in the water. With the bottom layer highlighted, Select Filter/Distort/Ripple. Here are the settings that I used.

And here is the finshed product.

Photoshop Tutorial: Dreamy effect editing

source: http://pswish.com/tutorial-make-perfume-commercial/

tut2-0.jpg

This tutorial will teach you how to make your very own fragrance advertisements, and even though we chose to use Monica Beluci in this tutorial, you can turn any ordinary home-made picture into a fragrance advertisement billboard. So first of all you need a picture of a girl (or boy you are doing to use. Pictures of people against black or dark backgrounds are better, since we will try to create an illusion of nocturnal sky.
___________________________________________________________________


___________________________________________________________________

tut2-1.jpg

Once you opened a new canvas with the desired dimensions of your billboard, create a new layer and fill it with any dark blue or dark purple hue, we used #210a3a. Make sure that your ‘background’ colour is set to white, and go to Filter >> Render >> Clouds. This will will your upper layer with nice foggy fibber texture. Set the overlay settings of this clouds layer to “Linear Light” (see illustration).

Our aim is to create a nicely high contrasted photo with a pit of fog and glow effect as well as make the background look like a night sky. SO, what we are going to do it, duplicate the photo of the girl, drag it (in the layer’s panel) on top of other 2 layers, and set this layer’s settings to “Overlay”

tut2-2.jpg

____________________________________________________________________

tut2-3.jpg

Next step is filling the bottom of the billboard with grass. This is the easiest part although I noticed that many get stuck here. We will be using the brush tool, with a default Photoshop CS2 brush called “brush dune”. You should have it. Set your foreground color to green (any hue, up to you, as long as it gives a natural look) and fill the bottom of the screen more or less like you see on the picture. The default settings for this brush are set to “scattering” so you don’t need to do much work except for just not overdoing the grass over the photo.

Next step is adding twirly shape.

If you don’t have any nice and twirly shape, you can download mine in PSD format HERE.

So you will either select a custom shape tool and draw any twirly shape of your choice, or take mine from the PSD file, drag and drop it to your canvas. Place the shame Between the girl’s layer and the grass (see below). Next, duplicate the shape later, transform it horizontally (or vertically, depending on your shape) and place it more or less as you can see on the illustration below.

tut2-4.jpgtut2-5.jpg

__________________________________________________________________

tut2-6.jpg

The idea is, to make the shape look as it’s behind the lady, so rasterize the upper shape’s layer and choose the Eraser Tool. Carefully remove the shape from the girl’s body. I’d suggest to use an eraser tool with hard edge, however if you want to nicely blend it with the fog effect on the background and not to make the edge too sharp, I suggest to use a 20px soft edge eraser tool.

Next step is adding glow. Make sure the upper shape is selected in your layers panel and go to Layer >> Layer styles >> Outer Glow. Apply the following glow settings using the white color. Repeat the same action for the first shape as well.

___________________________________________________________________

tut2-7.jpg

And this is what you got so far… You may also apply a few chaotic white dots, using the bruh tool and add glow, this will imitate stars on the background. This is optional, if you feel your background is too dull.

___________________________________________________________________

tut2-8.jpg

___________________________________________________________________

tut2-9.jpg

If you are making a fragrance billboard you will need a perfume bottle, but again this could be replaced with any other product you are going to “sell”. We went with this fragrance bottle from sxc.hu. Most important is to crop it properly and then find a good location for it on your billboard.

Once you have located it, it could be a good idea to add a little transparency to the glass so that you’d see the grass from underneath it. We just duplicated the layer and set one of them on “overlay”, the other on “soft” so we can see the grass through yet the bottle does not become semi-visible.

tut2-10.jpg

Saturday, May 3, 2008

How to take a picture and turn it to vector

Source: http://www.idigitalemotion.com/tutorials/guest/vector/vector.html

This tutorial is here just to get you into the swing of things for vectoring. It will teach you the basics of how to vector in Adobe Photoshop 6+. Don’t use this tutorial as a basic walkthrough to an easy vector,use it to learn the basics of vectoring so you can than use these methods fo

r your own work. I don’t want to suddenly see several vectors spring up over the internet that are identical to each other because they were taken from this tutorial. That said, let’s get started.

Firstly we’ll need to get a photograph (or sketch) of what we’re going to vector, you can vector thingsfrom scratch but with people or objects like cars its better to use reference, in this case we’ll be using a photograph. I’ve just taken a photograph of Aki Kawamura I found on a random search engine. You’ll only be using one tool in this. That’s the pen tool. Take the pen tool (fig.1) and select Shape Layers. (Fig2)


There will be no merging of layers, this is because we may have to cut away a section to reveal more skin/hair/clothing/whatever. We’ll start with the base layer of skin. For everything that is done, skin,hair or clothing, use 3 or 4 layers. Do not go over 5 layers, otherwise you’ll loose that simplistic look of the whole piece, if you do go over the 5 layer limit then you might as well do this for everything, you can still get a good vector using hundreds of layers, but I prefer the simplstic approach. As you can see here I’m not being too careful with the skin base layer edges. (Fig.3) this is because most edges around her face will be covered over with the hair layer later on. Once the base layer is done, start on the mid layer and work your way up to the third layer, which will be the darkest layer, I’ve worked up from the lightest to darkest layer here because there is a larger amount of light to dark in this photograph, but if it were the other way around we would be working from dark to light. (Fig.4)

Now that all the skin layers are complete we will start on her hair. Hair is always the most difficult thing to vector because its free and has many thin strands, the most time you spend on a vector will no doubt be hair. (unless your working on someone who’s bald) We’ll start with the base layer and cover the entire mass of her hair, even the light areas. With hair we always start from dark and work up to the lightest layer, because there is more dark than light, even on blondes. (Fig 5) Once this has been done we’ll work our way onto the second layer, the mid layer. This is were the most time consumming part comes in.Pick out all the lighter areas than the base layer, don’t worry about covering some dark areas. Once this is done, any dark areas that have been covered can be selected and cleared. Select PAths (Fig.6) for the pen tool and go over the dark areas of hair that have been covered by the mid layer, then right click > make selection and then clear the selection by pressing delete. (On your keyboard for the slow people at the back) After this are the higher layers for Aki’s hair I’ve used four layers because there was an even lighter area of hair because of the lighting in the photograph, use the same methods as you did for the mid layer hair and eventualy you should finish with something like this. (Fig.7)


By now you should have it figured out how to work with layers by moving up the lightest/darkest areas. You should implement the methods you’ve learned so far into working with the rest of her features such as her eyes, add a little Grey and you should get something like this (Fig. 8) Using these simple techniques can give you some good vector work. Hopefully you should go on and be able to create some nifty vector work now.


Vectoring Images Using Photoshop

my own way of vectorizing your picture using photoshop…

first, you need to look for the picture that you want to vectorize. I would suggest that if you have a high resolution photo, then go for it.

second, you need to duplicate your original photo, usually when you open an image on photoshop, the layer name is “background”. So you just have to duplicate the background layer or your image.

third, for you to have an easy way of tracing the shadows of the image, you just have to posterize your image, usually I set it to 3 or 4 but it depends on your satisfaction. To posterize, just click on Image, then click on Adjustments, then Posterize.

fourth, you simply need to trace the base area of the image, example the image is your picture, so you need to select the area of your skin, I suggest you use the pen tool, you can use other tracing tools like lasso but it is best suggested that you use the pen tool, and make sure that the pen tool is set for selection only.

fifth, let us assume you have already selected the area of your entire skin, then you need to create a new layer, make sure that you dont edit the background layer which is the original image and the posterize image. the images will be your guide. after selecting using the pen tool just simply right click on the selection and choose make selection. I suggest you just set the feather to 0.

sixth, now that you have selected the area, make sure that you are on the new layer that was created. then you need to fill the selected area with your desired color, but you can also determine the color of the area selected by using the eyedropper tool.

seventh, assuming that you have choosen the color for the area, then you need to fill the area selected with the color that you have choosen, one important thing is make sure not to deselect unless you have filled the area with your desired color.

now to continue vectorizing your image just simply repeat the steps that I mentioned, do the same on the details of the image, create layer, select, fill color, deselect and then repeat it again until the entire image is vectorized. after vectorizing the image you can simple add some editing like using the smudging tool or any other tool so that the vectorized image would look like the same as with the original image. I hope that I have given you some tips on how to vectorize your image using adobe photoshop.

Elements Signature Tutorial(Photoshop tutorial)