How to take a picture and turn it to vector
Source: http://www.idigitalemotion.com/tutorials/guest/vector/vector.html
This tutorial is here just to get you into the swing of things for vectoring. It will teach you the basics of how to vector in Adobe Photoshop 6+. Don’t use this tutorial as a basic walkthrough to an easy vector,use it to learn the basics of vectoring so you can than use these methods fo
r your own work. I don’t want to suddenly see several vectors spring up over the internet that are identical to each other because they were taken from this tutorial. That said, let’s get started.
Firstly we’ll need to get a photograph (or sketch) of what we’re going to vector, you can vector thingsfrom scratch but with people or objects like cars its better to use reference, in this case we’ll be using a photograph. I’ve just taken a photograph of Aki Kawamura I found on a random search engine. You’ll only be using one tool in this. That’s the pen tool. Take the pen tool (fig.1) and select Shape Layers. (Fig2)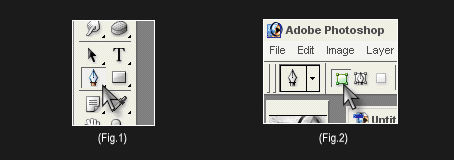
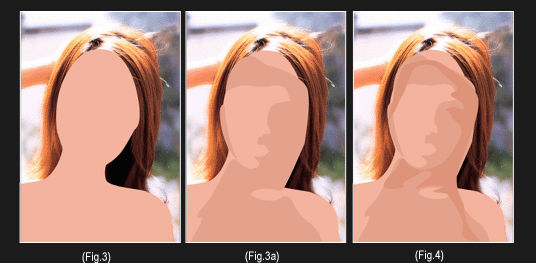
There will be no merging of layers, this is because we may have to cut away a section to reveal more skin/hair/clothing/whatever. We’ll start with the base layer of skin. For everything that is done, skin,hair or clothing, use 3 or 4 layers. Do not go over 5 layers, otherwise you’ll loose that simplistic look of the whole piece, if you do go over the 5 layer limit then you might as well do this for everything, you can still get a good vector using hundreds of layers, but I prefer the simplstic approach. As you can see here I’m not being too careful with the skin base layer edges. (Fig.3) this is because most edges around her face will be covered over with the hair layer later on. Once the base layer is done, start on the mid layer and work your way up to the third layer, which will be the darkest layer, I’ve worked up from the lightest to darkest layer here because there is a larger amount of light to dark in this photograph, but if it were the other way around we would be working from dark to light. (Fig.4)
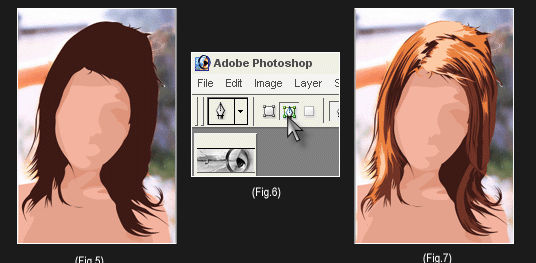 Now that all the skin layers are complete we will start on her hair. Hair is always the most difficult thing to vector because its free and has many thin strands, the most time you spend on a vector will no doubt be hair. (unless your working on someone who’s bald) We’ll start with the base layer and cover the entire mass of her hair, even the light areas. With hair we always start from dark and work up to the lightest layer, because there is more dark than light, even on blondes. (Fig 5) Once this has been done we’ll work our way onto the second layer, the mid layer. This is were the most time consumming part comes in.Pick out all the lighter areas than the base layer, don’t worry about covering some dark areas. Once this is done, any dark areas that have been covered can be selected and cleared. Select PAths (Fig.6) for the pen tool and go over the dark areas of hair that have been covered by the mid layer, then right click > make selection and then clear the selection by pressing delete. (On your keyboard for the slow people at the back) After this are the higher layers for Aki’s hair I’ve used four layers because there was an even lighter area of hair because of the lighting in the photograph, use the same methods as you did for the mid layer hair and eventualy you should finish with something like this. (Fig.7)
By now you should have it figured out how to work with layers by moving up the lightest/darkest areas. You should implement the methods you’ve learned so far into working with the rest of her features such as her eyes, add a little Grey and you should get something like this (Fig. Using these simple techniques can give you some good vector work. Hopefully you should go on and be able to create some nifty vector work now.
Now that all the skin layers are complete we will start on her hair. Hair is always the most difficult thing to vector because its free and has many thin strands, the most time you spend on a vector will no doubt be hair. (unless your working on someone who’s bald) We’ll start with the base layer and cover the entire mass of her hair, even the light areas. With hair we always start from dark and work up to the lightest layer, because there is more dark than light, even on blondes. (Fig 5) Once this has been done we’ll work our way onto the second layer, the mid layer. This is were the most time consumming part comes in.Pick out all the lighter areas than the base layer, don’t worry about covering some dark areas. Once this is done, any dark areas that have been covered can be selected and cleared. Select PAths (Fig.6) for the pen tool and go over the dark areas of hair that have been covered by the mid layer, then right click > make selection and then clear the selection by pressing delete. (On your keyboard for the slow people at the back) After this are the higher layers for Aki’s hair I’ve used four layers because there was an even lighter area of hair because of the lighting in the photograph, use the same methods as you did for the mid layer hair and eventualy you should finish with something like this. (Fig.7)By now you should have it figured out how to work with layers by moving up the lightest/darkest areas. You should implement the methods you’ve learned so far into working with the rest of her features such as her eyes, add a little Grey and you should get something like this (Fig.


No comments:
Post a Comment